
Power Amplifier Circuit – 25 Watts
Description
Here is the diagram of a 25 Watt power amplifier circuit made of TDA 2009 IC.TDA 2009 has two channels each rating 12.5 watts on 4 Ohm load.Here the two channels are bridged to get a single out put channel weighting 25 W.
TDA 2009 IC has also built in features such as short circuit protection,thermal protection, overload protection etc using very low external components.The most interesting factor I see about this IC is that it require no dual supply.
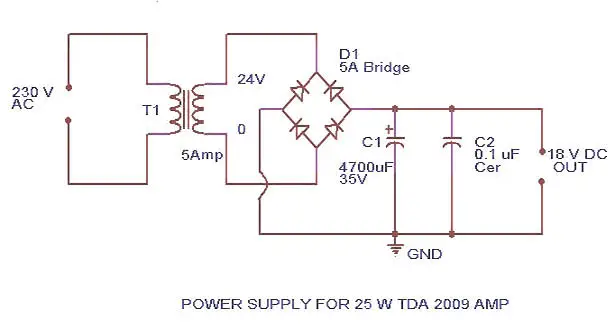
Power Amplifier Circuit Diagram and Power Supply Circuit Schematic

Notes
- Do not connect more than 24 V to TDA 2009.
- If 5 ampere bridge is not available make one using four 5 A diodes.
- Fit a proper size heat sink to TDA 2009
- Do not operate the circuit without heat sink.
- For volume control connect a 10K pot
- All capacitors in this circuit must be rated above 25 V
Share this on your favourite network


This circuit is fundamentally flawed! TDA2009 has a max input voltage of 28VDC. A 24VAC transformer, once put through a bridge rectifier and capacitor, will have a peak DC voltage of (24 * 1.41) - (2 * 0.7) = 32.4V
ReplyDeleteI have no idea where you got the idea that it would instead output 18VDC because that's just plain wrong.
Now having written that much, ironically I would not change the power supply circuit, instead using a more powerful amp IC that can tolerate 32.4V input. It's not so interesting that it doesn't need a dual rail +/- power supply. You can use most amp chips with a single rail supply, only needing to put a coupling capacitor on the output to block DC and allow AC through.
Lastly, you don't need 5A diodes with a 24VDC supply, let alone an 18V supply. Doing the math, in a hypothetical (impossible) 100% efficient amp, 24V into 8 ohms would be 3 amps max, but we both know the distortion would be terrible and the output would never be a continuous 3A, so a 3A bridge rectifier would work. Perhaps get a larger bridge rectifier anyway because the cost difference is so slight, but then there is no need to limit it to 5A, might as well get a larger 15A or more which will run cooler.